CentOS下Nginx1.17.0安装
软硬件准备
| 服务器 | 192.168.1.230 |
|---|---|
| 操作系统 | CentOS 7.5 |
| 均衡软件 | nginx-1.17.0.tar.gz |
环境部署
1.需要安装gcc环境
# yum install gcc-c++
2.PERE
PCRE(Perl Compatible Regular Expressions)是一个Perl库,包括 perl 兼容的正则表达式库。
nginx的http模块使用pcre来解析正则表达式,所以需要在linux上安装pcre库。
注:pcre-devel是使用pcre开发的一个二次开发库。nginx也需要此库
# yum install -y pcre pcre-devel
3 zlib
zlib库提供了很多种压缩和解压缩的方式,nginx使用zlib对http包的内容进行gzip,所以需要在linux上安装zlib库。
# yum install -y zlib zlib-devel
4 openssl
OpenSSL 是一个强大的安全套接字层密码库,囊括主要的密码算法、常用的密钥和证书封装管理功能及SSL协议,
并提供丰富的应用程序供测试或其它目的使用。
nginx不仅支持http协议,还支持https(即在ssl协议上传输http),所以需要在linux安装openssl库。
# yum -y install openssl openssl-devel
整体安装命令:
# yum -y install gcc-c++ pcre pcre-devel zlib zlib-devel openssl openssl-devel
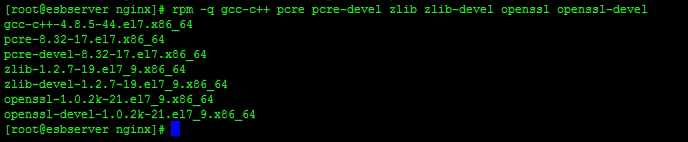
检查所需包是否都安装了
# rpm -q gcc-c++ pcre pcre-devel zlib zlib-devel openssl openssl-devel
Nginx安装
1.下载 Nginx
下载地址:https://nginx.org/en/download.html
[root@bogon nginx]# cd /opt/nginx
[root@bogon nginx]# wget http://nginx.org/download/nginx-1.17.0.tar.gz
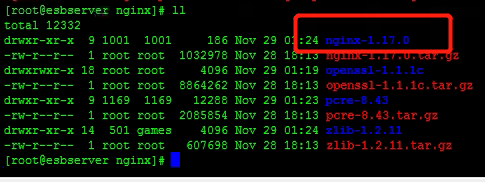
2.解压安装包
[root@bogon nginx]# tar zxvf nginx-1.17.0.tar.gz
3.进入安装包目录
[root@bogon nginx]# cd nginx-1.17.0
4.编译安装
[root@esbserver nginx-1.17.0]# ./configure \
> --prefix=/usr/local/nginx \
> --pid-path=/var/run/nginx/nginx.pid \
> --lock-path=/var/lock/nginx.lock \
> --error-log-path=/var/log/nginx/error.log \
> --http-log-path=/var/log/nginx/access.log \
> --with-http_gzip_static_module \
> --http-client-body-temp-path=/var/temp/nginx/client \
> --http-proxy-temp-path=/var/temp/nginx/proxy \
> --http-fastcgi-temp-path=/var/temp/nginx/fastcgi \
> --http-uwsgi-temp-path=/var/temp/nginx/uwsgi \
> --http-scgi-temp-path=/var/temp/nginx/scgi \
> --with-http_stub_status_module \
> --with-http_ssl_module \
> --with-file-aio \
> --with-http_realip_module
5. 创建临时目录/var/temp/nginx/
# mkdir /var/temp/nginx -p
6 .进入nginx-1.17.0里面执行make命令进行编译
[root@esbserver nginx-1.17.0]# make
7.进入nginx-1.17.0里面执行make install 命令进行安装
[root@esbserver nginx-1.17.0]# make install
8.进入安装位置/usr/local/nginx查看目录结构
[root@esbserver nginx-1.17.0]# cd /usr/local/nginx
[root@esbserver nginx]# ll
total 4
drwx------  2 nobody root    6 Nov 29 01:25 client_body_temp
drwxr-xr-x  2 root   root 4096 Dec  4 00:47 conf
drwx------  2 nobody root    6 Nov 29 01:25 fastcgi_temp
drwxr-xr-x  2 root   root   40 Nov 29 01:25 html
drwxr-xr-x  2 root   root   58 Dec  4 00:47 logs
drwx------ 12 nobody root   96 Dec  3 16:53 proxy_temp
drwxr-xr-x  2 root   root   36 May  6 18:42 sbin
drwx------  2 nobody root    6 Nov 29 01:25 scgi_temp
drwx------  2 nobody root    6 Nov 29 01:25 uwsgi_temp
[root@esbserver nginx]#
9.查看nginx版本
[root@esbserver nginx]# cd sbin[root@esbserver sbin]# ./nginx
-Vnginx version: nginx/1.17.0
built by gcc 4.8.5 20150623 (Red Hat 4.8.5-44) (GCC)
configure arguments: --prefix=/usr/local/nginx
--pid-path=/var/run/nginx/nginx.pid
--lock-path=/var/lock/nginx.lock
--error-log-path=/var/log/nginx/error.log
--http-log-path=/var/log/nginx/access.log
--with-http_gzip_static_module
--http-client-body-temp-path=/var/temp/nginx/client
--http-proxy-temp-path=/var/temp/nginx/proxy
--http-fastcgi-temp-path=/var/temp/nginx/fastcgi
--http-uwsgi-temp-path=/var/temp/nginx/uwsgi
--http-scgi-temp-path=/var/temp/nginx/scgi
到此,nginx安装完成。
其它控制命令
查看nginx是否启动
[root@admin sbin]# ps -aux | grep nginx
ps命令用于报告当前系统的进程状态。
-a:显示所有终端机下执行的程序,除了阶段作业领导者之外。
a:显示现行终端机下的所有程序,包括其他用户的程序。
u:以用户为主的格式来显示程序状况。
x:显示所有程序,不以终端机来区分。
启动nginx
进入sbin目录,执行命令./nginx
[root@admin sbin]# ./nginx
关闭nginx
[root@admin sbin]# ./nginx -s stop
或者
[root@admin sbin]# ./nginx -s quit
重启nginx
先关闭,然后启动
刷新配置文件
[root@admin sbin]# ./nginx -s reload
Nginx 启动报错
“/var/run/nginx/nginx.pid" failed” 解决方法
问题:
重启虚拟机后,再次重启nginx会报错: open() "/var/run/nginx/nginx.pid" failed (2: No such file or directory)
解决方法:
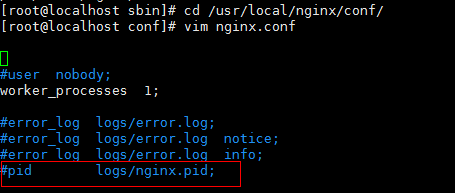
(1)进入 cd /usr/local/nginx/conf/ 目录,编辑配置文件nginx.conf ;
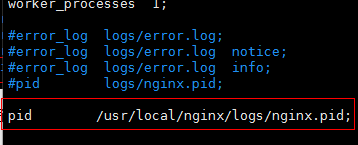
(2)在配置文件中有个注释的地方: #pid logs/nginx.pid;
(3)将注释放开,并修改为:pid /usr/local/nginx/logs/nginx.pid;
(4)在 /usr/local/nginx 目录下创建 logs 目录:mkdir /usr/local/nginx/logs
(5)启动nginx服务:/usr/local/nginx/sbin/nginx
设置开机自启动
首先,在linux系统的/etc/init.d/目录下创建nginx文件,使用如下命令:
vim /etc/init.d/nginx
在脚本中添加如下命令:
#!/bin/sh
#
# nginx - this script starts and stops the nginx daemon
#
# chkconfig:   - 85 15
# description:  NGINX is an HTTP(S) server, HTTP(S) reverse \
#               proxy and IMAP/POP3 proxy server
# processname: nginx
# config:      /etc/nginx/nginx.conf
# config:      /etc/sysconfig/nginx
# pidfile:     /var/run/nginx.pid
# Source function library.
. /etc/rc.d/init.d/functions
# Source networking configuration.
. /etc/sysconfig/network
# Check that networking is up.
[ "$NETWORKING" = "no" ] && exit 0
nginx="/usr/local/nginx/sbin/nginx"
prog=$(basename $nginx)
NGINX_CONF_FILE="/usr/local/nginx/conf/nginx.conf"
[ -f /etc/sysconfig/nginx ] && . /etc/sysconfig/nginx
lockfile=/var/lock/subsys/nginx
make_dirs() {
   # make required directories
   user=`$nginx -V 2>&1 | grep "configure arguments:" | sed 's/[^*]*--user=\([^ ]*\).*/\1/g' -`
   if [ -z "`grep $user /etc/passwd`" ]; then
       useradd -M -s /bin/nologin $user
   fi
   options=`$nginx -V 2>&1 | grep 'configure arguments:'`
   for opt in $options; do
       if [ `echo $opt | grep '.*-temp-path'` ]; then
           value=`echo $opt | cut -d "=" -f 2`
           if [ ! -d "$value" ]; then
               # echo "creating" $value
               mkdir -p $value && chown -R $user $value
           fi
       fi
   done
}
start() {
    [ -x $nginx ] || exit 5
    [ -f $NGINX_CONF_FILE ] || exit 6
    make_dirs
    echo -n $"Starting $prog: "
    daemon $nginx -c $NGINX_CONF_FILE
    retval=$?
    echo
    [ $retval -eq 0 ] && touch $lockfile
    return $retval
}
stop() {
    echo -n $"Stopping $prog: "
    killproc $prog -QUIT
    retval=$?
    echo
    [ $retval -eq 0 ] && rm -f $lockfile
    return $retval
}
restart() {
    configtest || return $?
    stop
    sleep 1
    start
}
reload() {
    configtest || return $?
    echo -n $"Reloading $prog: "
    killproc $nginx -HUP
    RETVAL=$?
    echo
}
force_reload() {
    restart
}
configtest() {
  $nginx -t -c $NGINX_CONF_FILE
}
rh_status() {
    status $prog
}
rh_status_q() {
    rh_status >/dev/null 2>&1
}
case "$1" in
    start)
        rh_status_q && exit 0
        $1
        ;;
    stop)
        rh_status_q || exit 0
        $1
        ;;
    restart|configtest)
        $1
        ;;
    reload)
        rh_status_q || exit 7
        $1
        ;;
    force-reload)
        force_reload
        ;;
    status)
        rh_status
        ;;
    condrestart|try-restart)
        rh_status_q || exit 0
            ;;
    *)
        echo $"Usage: $0 {start|stop|status|restart|condrestart|try-restart|reload|force-reload|configtest}"
        exit 2
esac
这个脚本来自nginx官方,脚本地址:http://wiki.nginx.org/RedHatNginxInitScript ,不过要注意,如果你是自定义编译安装的nginx,需要根据您的安装路径修改下面这两项配置:
nginx=”/usr/loca/nginx/sbin/nginx” 修改成nginx执行程序的路径。
NGINX_CONF_FILE=”/usr/local/nginx/conf/nginx.conf” 修改成配置文件的路径。
保存脚本文件后设置文件的执行权限:
chmod a+x /etc/init.d/nginx
然后,就可以通过该脚本对nginx服务进行管理了:
/etc/init.d/nginx start
/etc/init.d/nginx stop
使用chkconfig进行管理
上面的方法完成了用脚本管理nginx服务的功能,但是还是不太方便,比如要设置nginx开机启动等。这时可以使用chkconfig来设置。
先将nginx服务加入chkconfig管理列表:
chkconfig --add /etc/init.d/nginx
加完这个之后,就可以使用service对nginx进行启动,重启等操作了。
service nginx start
service nginx stop
设置终端模式开机启动:
systemctl enable nginx.service
© 2021 CFESB.CN all right reserved,powered by Gitbook 本文档更新于: 2021-05-22 16:26